Disney princess hairstyles step by step: A Comprehensive Guide to Recreating Iconic Looks

The enduring allure of Disney Princesses extends far beyond their captivating narratives and inspiring personalities; their distinct aesthetics, particularly their iconic hairstyles, have become a cornerstone of popular culture. These meticulously crafted coiffures symbolize character traits, historical periods, and magical transformations, making them instantly recognizable and deeply cherished. Understanding the techniques involved in recreating these celebrated looks offers a unique avenue for creative expression, enhancing costume authenticity, and developing advanced styling skills. This guide provides detailed, step-by-step instructions for achieving several of the most beloved princess hairstyles, presented in a clear and informative manner suitable for enthusiasts and professional stylists alike.
Recreating Classic Princess Styles
Achieving the signature hair of a Disney Princess requires attention to detail, proper preparation, and a methodical approach. The following sections break down the processes for some of the most iconic looks.
Cinderella’s Elegant Updo
Cinderella’s classic bun, often adorned with a simple headband, embodies timeless grace and sophistication. This style is perfect for formal events or a refined costume.
- Preparation: Begin with clean, dry hair. Apply a volumizing mousse or root lift spray to the crown area to provide a foundation for fullness. If hair is naturally very straight, a light application of heat protectant followed by large, loose curls with a curling iron can add texture and make the hair more pliable for pinning.
- Volumizing the Crown: Gently backcomb the hair at the crown in small sections. This creates a soft lift and prevents the style from appearing flat. Smooth the top layer of hair over the backcombed sections to maintain a polished appearance.
- Gathering the Hair: Collect all hair into a low ponytail at the nape of the neck. Secure it with a clear elastic. For added volume and a softer look, avoid pulling the ponytail too tightly against the scalp.
- Forming the Bun: Twist the ponytail loosely, then coil it around the base of the elastic, creating a neat bun. Secure the bun firmly with bobby pins, ensuring they are inserted into the base of the bun and anchored to the hair on the scalp. A hair net, matched to the hair color, can be used to keep stray hairs contained and maintain the bun’s shape.
- Finishing Touches: Carefully place a headband, tiara, or other desired accessory just behind the front hairline. Gently pull out a few wisps of hair around the face, if desired, to soften the look. Set the entire style with a strong-hold hairspray to ensure longevity.
Elsa’s Voluminous Side Braid (Frozen I)
Elsa’s iconic side braid from “Frozen” is characterized by its impressive volume, sweeping elegance, and intricate yet seemingly effortless appearance. This style requires building significant texture and volume.
- Hair Preparation and Texture: Start with clean, dry hair. Apply a texturizing spray or dry shampoo throughout the hair, particularly at the roots, to provide grip and volume. If hair is naturally fine, backcombing sections at the crown and along the sides can significantly enhance fullness.
- Creating Crown Disney Princess Hairstyles Step By Step A Comprehensive Guide To Recreating Iconic Looks Volume: Take a section of hair from the crown and gently backcomb it at the roots. Smooth the top layer over the backcombed section to create a soft, elevated pouf.
- Sweeping the Hair: Gather all hair to one side, typically over one shoulder. Ensure the hair from the opposite side is smoothly swept across the back of the head.
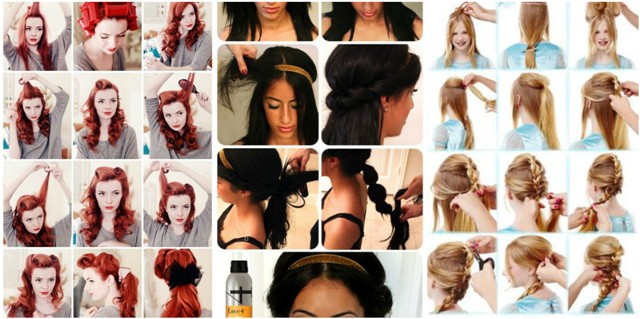
- Initiating the Braid: Begin a French or Dutch braid starting from the temple area on the side where the hair is gathered. For a Dutch braid, cross strands under the middle strand to make the braid stand out. For a French braid, cross strands over.
- Incorporating Sections: As the braid progresses down the side of the head, continuously incorporate small, even sections of hair from both the top and bottom, ensuring the braid remains loose and voluminous. Avoid pulling too tightly.
- Completing the Braid: Continue braiding all the way down to the ends of the hair. Secure the end with a clear elastic.
- Volumizing the Braid: Gently pull apart the loops of the braid from the bottom upwards. This technique, known as “pancaking,” creates the characteristic voluminous and relaxed appearance.
- Final Setting: Apply a generous amount of strong-hold hairspray to secure the style. If desired, a few sparkling accessories or glitter spray can be added to emulate Elsa’s magical aura.
Belle’s Romantic Half-Up, Half-Down
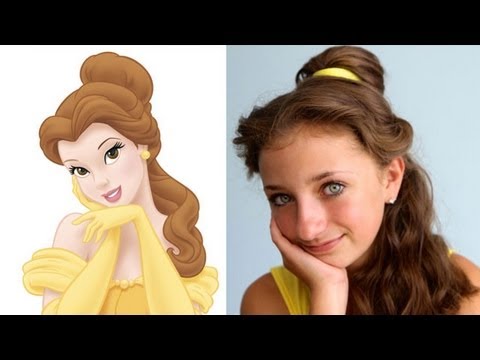
Belle’s hairstyle from “Beauty and the Beast” exudes a gentle, intellectual charm with its soft curls and a simple half-up arrangement, often adorned with a ribbon.
- Curling the Hair: Apply a heat protectant to dry hair. Using a medium-barrel curling iron (1-1.5 inches), curl all sections of the hair. Pin each curl to the scalp as it cools to set the shape, or allow them to cool naturally. Once cooled, gently release the curls and finger-comb them to create soft, flowing waves.
- Sectioning for the Half-Up Style: Create a horizontal parting from just above one ear to just above the other, across the crown of the head. This separates the top section of hair that will be pulled back from the hair that remains down.
- Gathering the Top Section: Gently gather the top section of hair, ensuring not to pull too tightly or disturb the volume at the crown.
- Securing the Half-Up: Secure this gathered section at the back of the head, typically at the occipital bone (the prominent bone at the back of the skull), using a small elastic or bobby pins. A slight pouf can be created by gently pushing the hair forward at the crown before securing.
- Adding the Ribbon: Tie a ribbon, ideally blue or yellow to match Belle’s iconic dresses, around the secured half-up section, forming a neat bow. Ensure the bow sits elegantly without overshadowing the curls.
- Finishing and Setting: Lightly mist the entire style with a flexible-hold hairspray to maintain the curls and hold the half-up section in place without stiffness. Adjust any curls around the face for a soft, framing effect.
Rapunzel’s Enchanting Long Braid (Tangled)
Rapunzel’s incredibly long, flower-adorned braid is perhaps the most ambitious of all princess styles, often requiring the use of hair extensions to achieve its iconic length and volume.
- Preparation and Extensions: Begin with thoroughly detangled hair. For most individuals, high-quality hair extensions are essential. Clip-in or sew-in extensions should be strategically placed throughout the head, focusing on adding length and volume, particularly at the back. Ensure the extensions are well-blended with natural hair.
- Volumizing the Crown (Optional): If additional height is desired at the crown, gently backcomb a section of hair before beginning the braid.
- Initiating the Braid: Gather all hair, including the extensions, at the back of the head. Begin a standard three-strand braid, or for a more intricate look, a loose French or Dutch braid starting from the nape of the neck.
- Consistent Braiding: Maintain consistent tension and section size throughout the braiding process. The goal is a thick, even braid that extends to the desired length. If using clip-in extensions, ensure the clips are completely hidden within the braid.
- Adding Embellishments: As the braid progresses, or once it is complete, weave in small artificial flowers, ribbons, or other decorative elements. Distribute them evenly along the length of the braid to replicate Rapunzel’s enchanting look.
- Securing the Braid: Secure the very end of the braid with a strong elastic, optionally covering it with a decorative tie or a final flower.
- Final Setting: Lightly mist the entire braid with a strong-hold hairspray to tame any flyaways and ensure the embellishments remain in place. The sheer length and weight of the style necessitate a robust hold.
FAQs by disney princess hairstyles step by step
Q1: What hair types are most suitable for these styles?
A1: Most styles are adaptable across various hair types. However, thicker, longer hair generally provides a more robust foundation for voluminous updos and elaborate braids, often requiring fewer supplementary products or extensions. Finer hair may necessitate more backcombing, texturizing products, and strategic pinning to achieve desired fullness.
Q2: Are extensions necessary for recreating specific looks?
A2: For styles characterized by extreme length or volume, such as Rapunzel’s iconic braid, hair extensions are frequently essential to achieve an authentic representation. For other styles, extensions can enhance fullness and provide a more dramatic effect, though they may not be strictly necessary.
Q3: How can these styles be adapted for children?
A3: Adapting these looks for children involves simplifying steps, using gentler products, and prioritizing comfort. Smaller sections of hair, lighter-hold products, and fewer pins are recommended. Focus on the core elements of the style rather than replicating every intricate detail.
Q4: What products are essential for achieving long-lasting results?
A4: Essential products include heat protectant (if using heat tools), volumizing mousse or spray for body, strong-hold hairspray for setting, and a variety of bobby pins and hair elastics for securing. Texturizing spray or dry shampoo can also be highly beneficial for adding grip and volume.
Q5: How long does it typically take to complete one of these styles?
A5: The time required varies significantly based on the complexity of the chosen style, the individual’s hair length and type, and the stylist’s skill level. Simple half-up styles might take 15-30 minutes, while elaborate braids or updos, especially those involving extensions, could require an hour or more.
Tips by disney princess hairstyles step by step
Tip 1: Preparation is Key: Always commence styling with clean, dry hair. Apply appropriate preparatory products such as heat protectant, volumizing mousse, or texturizing spray to establish a strong foundation for the desired style. This significantly impacts the style’s longevity and finish.
Tip 2: Sectioning Best Hairstyles For Medium Length Curly Hair A Comprehensive Guide for Precision: Divide hair into manageable, organized sections prior to commencing any braiding, curling, or pinning. This systematic approach ensures even styling, prevents tangles, and facilitates a neater, more professional outcome.
Tip 3: Utilize Proper Tools: Invest in and utilize high-quality styling tools. This includes brushes designed for detangling and smoothing, various types of combs (rat-tail for sectioning, teasing comb for volume), curling irons of appropriate barrel sizes, and a comprehensive assortment of hairpins (bobby pins, U-pins) and elastics.
Tip 4: Practice and Patience: Mastery of complex hairstyles necessitates repeated attempts. Initial challenges are a natural part of the learning process. Persistence and a patient approach will lead to improved technique and more refined results over time.
Tip 5: Secure and Set: Employ strong-hold hairspray generously and strategically utilize bobby pins to ensure the completed style remains intact for an extended duration. For updos and braids, anchoring pins securely to the scalp and crisscrossing them for extra grip is crucial.
Tip 6: Accessorize Authentically: Incorporate relevant accessories to enhance the authenticity and visual impact of the chosen look. Headbands, ribbons, bows, or artificial flowers, when selected to match the specific princess’s aesthetic, elevate the overall presentation.
Conclusion by disney princess hairstyles step by step
The enduring appeal and cultural significance of Disney Princess hairstyles underscore their status as more than mere fictional adornments; they are symbols of character, aspiration, and timeless beauty. Recreating these iconic looks offers a rewarding experience, fostering creativity, developing meticulous styling skills, and providing a tangible connection to beloved narratives. The techniques outlined in this guide are versatile, applicable not only for costume events but also for themed parties, creative photography, or simply as a means of exploring diverse hair styling possibilities. The satisfaction derived from transforming hair into a beloved character’s signature aesthetic, executed with precision and care, is a testament to the lasting magic these styles continue to hold.


More suggestion: Straight Hair Hairstyles Pinterest A Comprehensive Guide To Visual Hair Inspiration